# Email notification step
Deployments can have a strong impact on the people whose work depends on the system being deployed. Great communication is an important part of a great deployment strategy, and email steps are a key way that Octopus can help you keep everyone in the loop. You may want to:
- Notify stakeholders when a new version of an app has been deployed to production.
- Let testers know when a new version is available in UAT.
- Use email in conjunction with [manual interventions approvals](/docs/projects/built-in-step-templates/manual-intervention-and-approvals) to make sure everyone is ready for a new deployment.
[Getting Started - Email Notifications](https://www.youtube.com/watch?v=VromFu8RYxc)
Before you can add email steps to your deployment processes, you need to add your SMTP configuration.
## SMTP configuration
To add your SMTP configuration navigate to **Configuration ➜ SMTP** and set the following values:
| Property | Description | Example |
| ------------------ | ------------------------------------ | ----------- |
| SMTP Host | The DNS hostname for your SMTP server. | smtp.example.com |
| SMTP Port | The TCP port for your SMTP server. | 25 |
| Timeout | The timeout for SMTP operations. Value is in milliseconds. | 12000 (12 seconds) |
| Use SSL/TLS | This option controls whether or not Octopus enforces using an SSL/TLS-wrapped connection. | True |
| From Address | The address which all emails will be sent 'From'. | octopus@mydomain.com |
| Credentials | Optional SMTP login / password if your SMTP server requires authentication. | mylogin@mydomain.com / SuperSecretPa$$word |
Click **Save and test** to save the SMTP configuration and verify the values are valid:
:::figure

:::
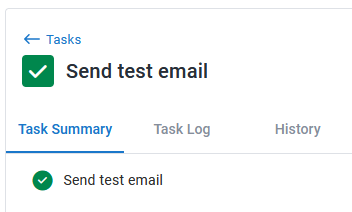
You will be prompted for an email address to send a test email to. Enter a test email address and click **Ok**. A *Send test email* task will start to verify your SMTP Configuration:
:::figure
:::
### Google OAuth 2.0 Credentials
Optionally you can use Workload Identity Federation and OAuth 2.0 for Google SMTP authentication. To do this, set the following values:
| Property | Description | Example |
| ------------------ | ------------------------------------ | ----------- |
| Audience | The audience set on the Workload Identity Federation | `https://iam.googleapis.com/projects/{project-id}/locations/global/workloadIdentityPools/{pool-id}/providers/{provider-id}` |
| Service Account | The email of the service account which has been granted access | service-account-name@{project-id}.iam.gserviceaccount.com |
See the [Google cloud documentation](https://cloud.google.com/iam/docs/workload-identity-federation-with-other-providers) for instructions on creating and configuring a Workload Identity Federation.
When setting up the Workload Identity Federation:
- When granting access to the service account, the principal must have the subject attribute name set to `smtp`. Example: `https://iam.googleapis.com/projects/{project-id}/locations/global/workloadIdentityPools/{pool-id}/subject/smtp`.
- The service account must have domain wide delegation with an OAuth scope of `https://mail.google.com/`, see [documentation](https://developers.google.com/identity/protocols/oauth2/service-account#delegatingauthority) on how to set this up.
### Microsoft OAuth 2.0 Credentials
:::div{.warning}
Support for Microsoft OAuth 2.0 authentication requires Octopus Server version 2025.2
:::
Optionally for Microsoft SMTP authentication, you can use Federated Credentials and OAuth 2.0. To do this, set the following values:
| Property | Description | Example |
| ------------------ | ------------------------------------ | ----------- |
| Audience | The audience set on the Federated Credential | Defaults to `api://AzureADTokenExchange` |
| Permission Scopes | The scopes to be included in the authentication token | Defaults to `https://outlook.office365.com/.default` |
| Client ID | The Azure Active Directory Application ID/Client ID | GUID in the format xxxxxxxx-xxxx-xxxx-xxxx-xxxxxxxxxxxx |
| Tenant ID | The Azure Active Directory Tenant ID | GUID in the format xxxxxxxx-xxxx-xxxx-xxxx-xxxxxxxxxxxx |
For OAuth 2.0 you will need to:
1. Set up a Microsoft Entra ID App Registration.
- See [documentation on registering an application](https://learn.microsoft.com/en-us/entra/identity-platform/quickstart-register-app?tabs=federated-credential%2Cexpose-a-web-api#register-an-application).
- Set the configuration properties `Client ID` and `Tenant ID` with the values from your registered application.
2. Add a Federated Credential.
- See [documentation on adding credentials](https://learn.microsoft.com/en-us/entra/identity-platform/quickstart-register-app?tabs=federated-credential%2Cexpose-a-web-api#add-credentials).
- Set the Issuer value to a publicly accessible Octopus Server URI, this value must also not have a trailing slash (/).
- Set the Subject Identifier value to `smtp`.
- The Audience value can be left as the default, or set to a custom value if needed.
- Set the `Audience` configuration property with the value from your federated credential.
3. Configure Microsoft Exchange SMTP settings.
- Add SMTP permissions for your Entra AD application, see [documentation](https://learn.microsoft.com/en-gb/exchange/client-developer/legacy-protocols/how-to-authenticate-an-imap-pop-smtp-application-by-using-oauth#add-the-pop-imap-or-smtp-permissions-to-your-microsoft-entra-application).
- For Exchange Online access, ensure you have added the `SMTP.SendAsApp` Office 365 Exchange Online application permission and granted admin consent.
- Register your application's service principal in Exchange, see [documentation](https://learn.microsoft.com/en-gb/exchange/client-developer/legacy-protocols/how-to-authenticate-an-imap-pop-smtp-application-by-using-oauth#register-service-principals-in-exchange).
:::div{.hint}
From 2025.3, you can specify custom Permission Scopes to be included in the OAuth 2.0 authentication token.
This supports the use of Azure Communication Services (ACS). To use this ensure your SMTP Username in Azure matches your specified `From Address`. More information can be found in the [ACS documentation](https://learn.microsoft.com/en-us/azure/communication-services/quickstarts/email/send-email-smtp/send-email-smtp-oauth).
:::
## Add an email step
Email steps are added to deployment processes in the same way as other steps.
1. Navigate to your [project](/docs/projects).
2. Click **Process** and **Add step** to add a step to an existing process. Alternatively, if this is a new deployment process, click the **Create process** button.
3. Find the **Send an Email** step and click **Add step**.
4. Give the step a short memorable name.
5. Choose the recipients of the email. You have several options:
- Enter a comma-separated list of email addresses.
- Bind to a [variable](/docs/projects/variables) which defines a list of email addresses (this is useful for tailoring your recipient list per-environment).
- Choose [one or more teams](/docs/security/users-and-teams) to include members of those teams in the recipient list.
- Use a combination of all of these options.
Octopus will build the resulting recipient list during the deployment, remove duplicate email addresses, and send the email to each recipient.
6. Provide a subject line for the emails. The subject can contain Octopus [basic variable syntax](/docs/projects/variables/variable-substitutions/#basic-syntax-variablesubstitutionsyntax-basicsyntax).
7. Add the body of the email. The email can be sent in plain text or HTML, and you can use Octopus [extended variable syntax](/docs/projects/variables/variable-substitutions/#extended-syntax) to include information about the deployment in the email. See the [email template examples](#email-template-examples) below.
8. You can set conditions to determine when the step should run. For instance:
- Send the email only for successful deployments to certain environments.
- Send a specific email for failed deployments.
- Send an email based on the value of a variable expression which works well with [output variables](/docs/projects/variables/output-variables).
9. Save the deployment process.
## Email template examples
You can set the email subject and author the email body as plain text or HTML content. You can even use the Octopus [variable syntax](/docs/projects/variables/variable-substitutions) to include information about the deployment in the email.
### Deployment summary template
This template collects basic information about the deployment, including the package versions included in each step.
```xml
Deployment of #{Octopus.Project.Name} #{Octopus.Release.Number} to #{Octopus.Environment.Name}
Initiated by
#{unless Octopus.Deployment.CreatedBy.DisplayName}#{Octopus.Deployment.CreatedBy.Username}#{/unless}
#{if Octopus.Deployment.CreatedBy.DisplayName}#{Octopus.Deployment.CreatedBy.DisplayName}#{/if}
#{if Octopus.Deployment.CreatedBy.EmailAddress} (#{Octopus.Deployment.CreatedBy.EmailAddress})#{/if}
at #{Octopus.Deployment.Created}
#{if Octopus.Release.Notes}
Release notes
#{Octopus.Release.Notes}
#{/if}
Deployment process
The deployment included the following actions:
#{each action in Octopus.Action}
- #{action.Name} #{if action.Package.NuGetPackageId}— #{action.Package.NuGetPackageId} version #{action.Package.NuGetPackageVersion}#{/if}
#{/each}
View the detailed deployment log.
```
:::div{.hint}
To use the template in your projects, replace `nuget.org` with the DNS name of your NuGet server, and `my-octopus` with the DNS name of your Octopus Server. Make sure you select *Body is HTML* on the email step configuration page.
:::
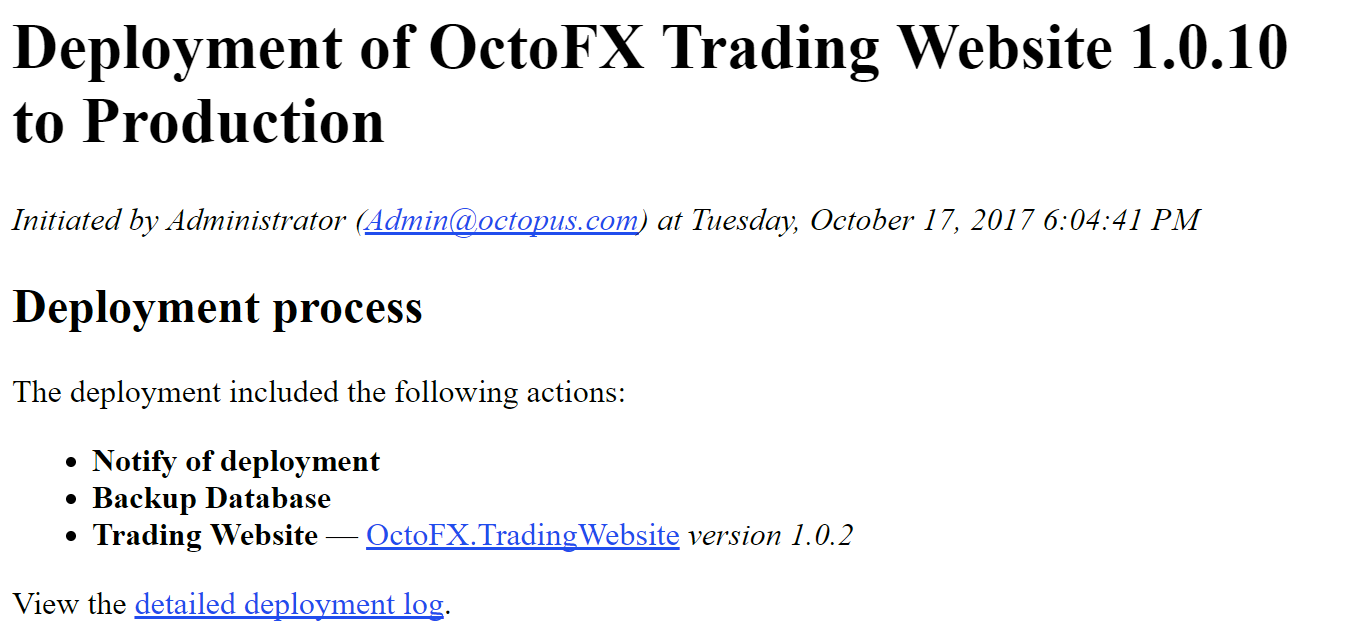
The output of the template will be an HTML email like:
:::figure
:::
### Step status summary template
The outcome of each step can be included using a template like the one below:
```xml
Task summary
#{each step in Octopus.Step}
#{if step.Status.Code}
- #{step | HtmlEscape} — #{step.Status.Code}
#{if step.Status.Error}
#{step.Status.Error | HtmlEscape}
#{step.Status.ErrorDetail | HtmlEscape}
#{/if}
#{/if}
#{/each}
```
:::div{.hint}
**Step error detail**
`step.Status.Error` and `step.Status.ErrorDetail` will only display the exit code and Octopus stack trace for the error. As we cannot parse the deployment log, we can only extract the exit/error codes. It cannot show detailed information on what caused the error. For full information on what happened when the deployment fails, you will need to reference the logs.
See [system variables](/docs/projects/variables/system-variables) for more detail.
:::
### Referencing package metadata
This example displays package ID and version numbers for any steps that reference a package.
```xml
#{each action in Octopus.Action}
#{if Octopus.Action[#{action.StepName}].Package.PackageId}
PackageId: #{Octopus.Action[#{action.StepName}].Package.PackageId}
Package Version: #{Octopus.Action[#{action.StepName}].Package.PackageVersion}
#{/if}
#{/each}
```
:::div{.hint}
Iterating over `Octopus.Action` like above is a useful way to retrieve data from all steps in your process without having to refer to a hard-coded step name that could potentially change.
:::
#### Referencing additional package metadata
Using [custom scripts](/docs/deployments/custom-scripts) you can include additional [reference packages](/docs/deployments/custom-scripts/run-a-script-step/#referencing-packages). This example displays package ID and version numbers for any steps that include additional reference packages.
```xml
#{each action in Octopus.Action}
#{each package in action.Package}
#{if Octopus.Action[#{action.StepName}].Package[#{package}].PackageId}
PackageId: #{Octopus.Action[#{action.StepName}].Package[#{package}].PackageId}
Package Version: #{Octopus.Action[#{action.StepName}].Package[#{package}].PackageVersion}
#{/if}
#{/each}
#{/each}
```