# Codefresh Pipelines
Codefresh is a docker-native CI/CD platform
[Codefresh Pipelines](https://codefresh.io/docs/docs/pipelines/introduction-to-codefresh-pipelines/) are workflows that form Codefresh's continuous integration (CI) platform.
# Integrating with Codefresh Pipelines
Codefresh pipelines allow you to customize steps to create, deploy and promote releases to your Octopus Deploy [environments](/docs/infrastructure/environments/). The steps do this by running the [Octopus CLI](/docs/octopus-rest-api/octopus-cli) inside a Docker container.
Octopus Deploy has several custom pipeline steps available:
- [Log into Octopus](https://codefresh.io/steps/step/octopusdeploy-login)
- [Create a package](https://codefresh.io/steps/step/octopusdeploy-create-package)
- [Push a package](https://codefresh.io/steps/step/octopusdeploy-push-package)
- [Create a release](https://codefresh.io/steps/step/octopusdeploy-create-release)
- [Deploy a release](https://codefresh.io/steps/step/octopusdeploy-deploy-release)
- [Deploy a tenanted release](https://codefresh.io/steps/step/octopusdeploy%2Fdeploy-release-tenanted)
- [Run a runbook](https://codefresh.io/steps/step/octopusdeploy-run-runbook)
- [Push build information](https://codefresh.io/steps/step/octopusdeploy-push-build-information)
## Codefresh Pipeline step configuration
When creating your first Codefresh Pipeline, the pipeline workflow can be defined in the Codefresh UI or within a git-based repository. The workflow yaml defines the steps to run and any arguments required to run each step.
The details of an Octopus instance are required to run all Octopus Codefresh steps:
| Variable name | Description |
|------------------------|---------------------------------------------------------------------------------------------------------------------|
| `OCTOPUS_URL` | The Octopus Server URL you wish to run your steps on |
| `OCTOPUS_API_KEY` | The Octopus Deploy API Key required for authentication |
| `OCTOPUS_ACCESS_TOKEN` | This value is set by the **octopusdeploy-login** step, and should be passed as an argument to all following steps |
| `AUDIENCE` | The Octopus Deploy audience or service account ID required for authentication |
| `OCTOPUS_SPACE` | The Space to run steps on |
### Authentication to Octopus server
The following steps require Octopus server authentication:
- [Push a package](https://codefresh.io/steps/step/octopusdeploy-push-package)
- [Create a release](https://codefresh.io/steps/step/octopusdeploy-create-release)
- [Deploy a release](https://codefresh.io/steps/step/octopusdeploy-deploy-release)
- [Deploy a tenanted release](https://codefresh.io/steps/step/octopusdeploy%2Fdeploy-release-tenanted)
- [Run a runbook](https://codefresh.io/steps/step/octopusdeploy-run-runbook)
- [Push build information](https://codefresh.io/steps/step/octopusdeploy-push-build-information)
There are two options for authentication. You can:
1. Use the [Log into Octopus step](https://codefresh.io/steps/step/octopusdeploy-login) and provide `OCTOPUS_ACCESS_TOKEN` as an argument for each step.
2. Skip the login step and provide an `OCTOPUS_API_KEY` as an argument for each step.
## Codefresh variables
It is recommended to use Codefresh variables to set the `OCTOPUS_URL` and an encrypted variable to set the `AUDIENCE`. This way, you can simply insert the variable for all octopus deploy steps in your workflow.
These can be set by clicking **Add Variable** from the **Variable** menu of your Codefresh Pipeline.
Enter your variable name and value. To insert the variable in your workflow, use the Codefresh variable syntax `${{YOUR_VARIABLE_NAME}}`
:::figure

:::
For more details on Codefresh pipeline variables, see the Codefresh documentation on [Variables in pipelines](https://codefresh.io/docs/docs/pipelines/variables/).
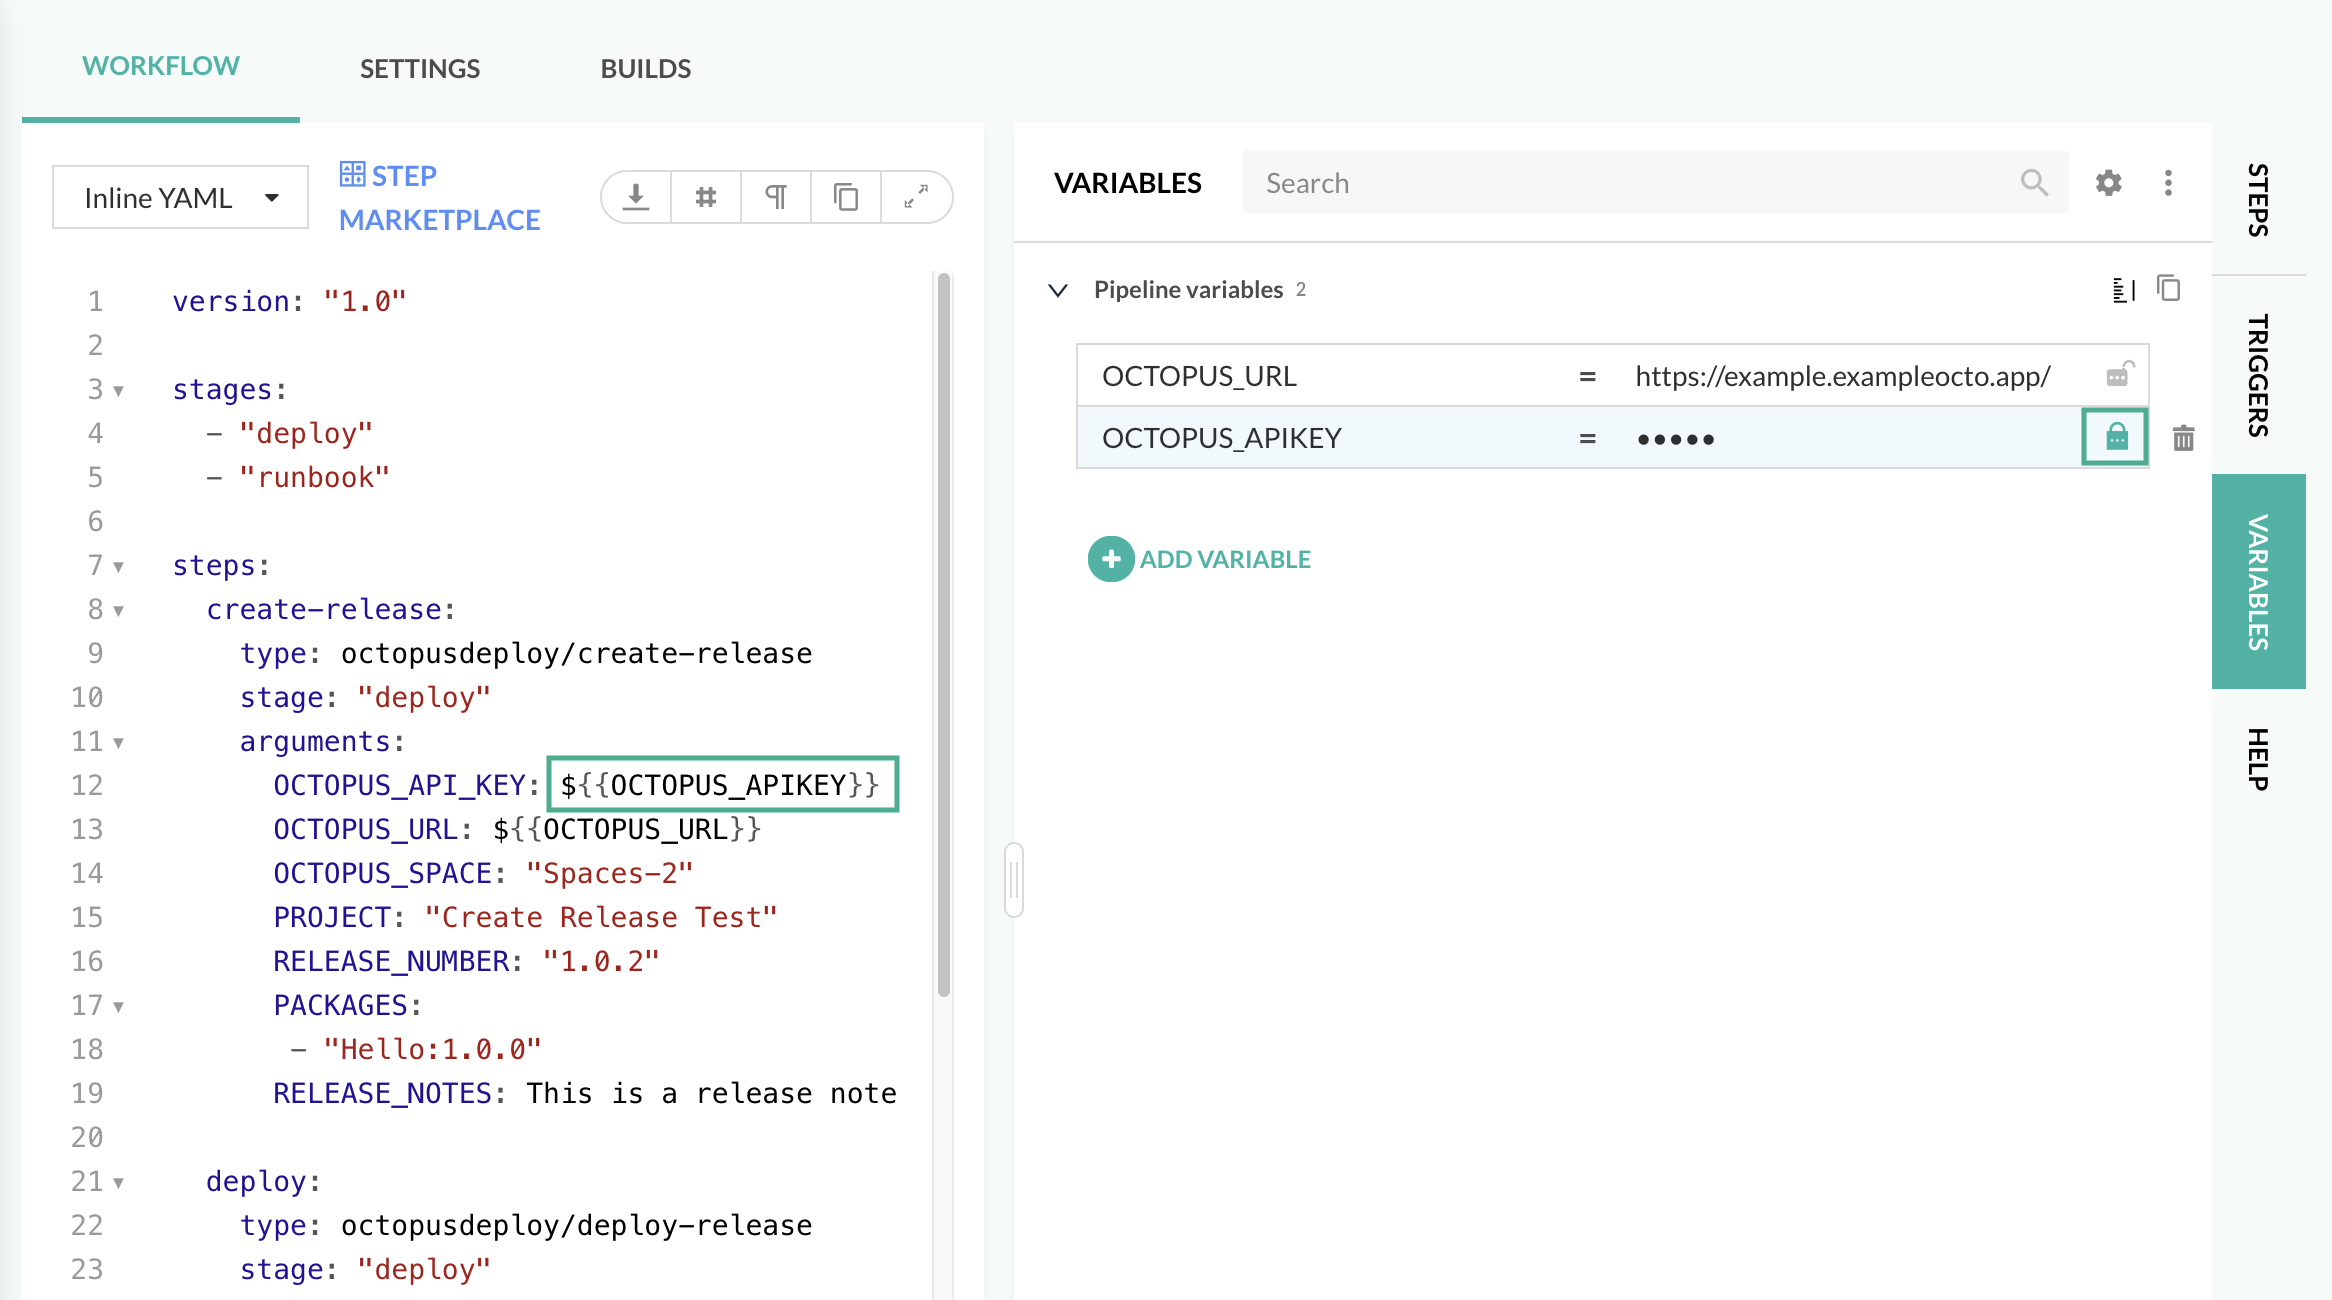
## Codefresh encrypted variables
To store sensitive information such as Octopus Deploy API keys, you can use Codefresh's encrypted variables in your workflow. To encrypt the variable, click on the lock next to the variable value.
:::figure
:::
## Triggering a build
A build can be triggered in a few different ways such as:
- Push commits
- Pull requests
- On-demand
And others depending on your git provider. Please see the [Codefresh documentation on supported git trigger events](https://codefresh.io/docs/docs/pipelines/triggers/git-triggers/).
For details on how to configure git triggers, see the [Codefresh documentation on Git Triggers](https://codefresh.io/docs/docs/pipelines/triggers/git-triggers/).
# Codefresh Pipeline stages
Codefresh Pipelines are workflows that consist of ***steps***. By default, the Codefresh execution engine will execute sequentially from the first defined step in the `codefresh.yml` file. To [configure parallel steps in your pipeline](https://codefresh.io/docs/docs/pipelines/advanced-workflows/), see the Codefresh documentation for more details.
Before defining the steps in your workflow, you can configure in ***stages***. You can then assign a stage for each of the steps in your pipeline. Stages are groups used to define how the steps will be visualized in the UI, and have no effect on the execution of the steps.
```yaml
version: "1.0"
stages:
- "Deploy project"
- "Run the runbook"
steps:
create-release:
type: octopusdeploy-create-release
stage: "Deploy project"
arguments:
...
deploy:
type: octopusdeploy-deploy-release
stage: "Deploy project"
arguments:
...
run-runbook:
type: octopusdeploy-run-runbook
stage: "Run the runbook"
arguments:
...
```
# Example Pipeline builds
The following examples demonstrate a Codefresh Pipeline build of an application sourced from Github.
## When using the Login step
To build and deploy this application, you'll need the following steps:
- Clone the source code
- Obtain OIDC token (available from the [Codefresh Marketplace](https://codefresh.io/steps/))
- Login
- Create a package
- Push package to Octopus Deploy instance
- Create a release for an existing project (get started with the basics of [setting up a project](/docs/projects/setting-up-projects))
- Deploy
Below is an example Codefresh Pipeline workflow which includes these steps:
Click here to view the entire example build YAML
```yaml
version: "1.0"
stages:
- "build and push"
- "deploy"
steps:
clone:
title: "Cloning repository"
type: "git-clone"
stage: "build and push"
repo: <>
revision: "main"
working_directory: "/codefresh/volume"
credentials:
username: ${{GITHUB_USERNAME}}
password: ${{GITHUB_PASSWORD}}
obtain_id_token:
title: Obtain ID Token
type: obtain-oidc-id-token
stage: "Login"
login:
type: octopusdeploy-login
title: Login
stage: "login"
arguments:
# ID_TOKEN is set as an environment variable by the obtain_id_token step
ID_TOKEN: '${{ID_TOKEN}}'
OCTOPUS_URL: "https://example.octopustest.app/"
OCTOPUS_SERVICE_ACCOUNT_ID: <>
create-package:
title: "Create package"
type: octopusdeploy-create-package
stage: "build and push"
arguments:
ID: "Hello"
VERSION: "1.0.0-${{CF_BUILD_ID}}"
BASE_PATH: "/codefresh/volume"
OUT_FOLDER: "/codefresh/volume"
push-package:
title: "Push package"
type: octopusdeploy-push-package
stage: "build and push"
arguments:
# OCTOPUS_ACCESS_TOKEN is set as an environment variable by the octopusdeploy-login step
OCTOPUS_ACCESS_TOKEN: ${{OCTOPUS_ACCESS_TOKEN}}
OCTOPUS_URL: ${{OCTOPUS_URL}}
OCTOPUS_SPACE: "Spaces-42"
PACKAGES:
- "/codefresh/volume/Hello.1.0.0-${{CF_BUILD_ID}}.zip"
OVERWRITE_MODE: 'overwrite'
create-release:
type: octopusdeploy-create-release
title: "Create release"
stage: "deploy"
arguments:
OCTOPUS_ACCESS_TOKEN: ${{OCTOPUS_ACCESS_TOKEN}}
OCTOPUS_URL: ${{OCTOPUS_URL}}
OCTOPUS_SPACE: "Spaces-42"
PROJECT: "Demo Project"
RELEASE_NUMBER: "1.0.0-${{CF_BUILD_ID}}"
PACKAGES:
- "Hello:1.0.0-${{CF_BUILD_ID}}"
RELEASE_NOTES: This is a release note
deploy:
type: octopusdeploy-deploy-release
title: "Deploy release"
stage: "deploy"
arguments:
OCTOPUS_ACCESS_TOKEN: ${{OCTOPUS_ACCESS_TOKEN}}
OCTOPUS_URL: ${{OCTOPUS_URL}}
OCTOPUS_SPACE: "Spaces-42"
PROJECT: "Demo Project"
RELEASE_NUMBER: "1.0.0-${{CF_BUILD_ID}}"
ENVIRONMENTS:
- "Development"
```
## When using an API key
To build and deploy this application, you'll need the following steps:
- Clone the source code
- Create a package
- Push package to Octopus Deploy instance
- Create a release for an existing project (get started with the basics of [setting up a project](/docs/projects/setting-up-projects))
- Deploy
Below is an example Codefresh Pipeline workflow which includes these steps:
Click here to view the entire example build YAML
```yaml
version: "1.0"
stages:
- "build and push"
- "deploy"
steps:
clone:
title: "Cloning repository"
type: "git-clone"
stage: "build and push"
repo: <>
revision: "main"
working_directory: "/codefresh/volume"
credentials:
username: ${{GITHUB_USERNAME}}
password: ${{GITHUB_PASSWORD}}
create-package:
title: "Create package"
type: octopusdeploy-create-package
stage: "build and push"
arguments:
ID: "Hello"
VERSION: "1.0.0-${{CF_BUILD_ID}}"
BASE_PATH: "/codefresh/volume"
OUT_FOLDER: "/codefresh/volume"
push-package:
title: "Push package"
type: octopusdeploy-push-package
stage: "build and push"
arguments:
OCTOPUS_API_KEY: ${{OCTOPUS_API_KEY}}
OCTOPUS_URL: ${{OCTOPUS_URL}}
OCTOPUS_SPACE: "Spaces-42"
PACKAGES:
- "/codefresh/volume/Hello.1.0.0-${{CF_BUILD_ID}}.zip"
OVERWRITE_MODE: 'overwrite'
create-release:
type: octopusdeploy-create-release
title: "Create release"
stage: "deploy"
arguments:
OCTOPUS_API_KEY: ${{OCTOPUS_API_KEY}}
OCTOPUS_URL: ${{OCTOPUS_URL}}
OCTOPUS_SPACE: "Spaces-42"
PROJECT: "Demo Project"
RELEASE_NUMBER: "1.0.0-${{CF_BUILD_ID}}"
PACKAGES:
- "Hello:1.0.0-${{CF_BUILD_ID}}"
RELEASE_NOTES: This is a release note
deploy:
type: octopusdeploy-deploy-release
title: "Deploy release"
stage: "deploy"
arguments:
OCTOPUS_API_KEY: ${{OCTOPUS_API_KEY}}
OCTOPUS_URL: ${{OCTOPUS_URL}}
OCTOPUS_SPACE: "Spaces-42"
PROJECT: "Demo Project"
RELEASE_NUMBER: "1.0.0-${{CF_BUILD_ID}}"
ENVIRONMENTS:
- "Development"
```
# Octopus Deploy steps
Octopus Deploy steps and examples are available from the [Codefresh Marketplace](https://codefresh.io/steps/).
Each step includes one or two examples to help with setting up a workflow. Basic examples include only required arguments, and complex examples include both required and optional arguments.
## Log into Octopus
The **octopusdeploy-login** step authenticates to Octopus via OIDC, so your Octopus server needs a [service account with OIDC enabled](/docs/octopus-rest-api/openid-connect/other-issuers).
To allow connections from Codefresh, the service account's OIDC identity should have **Issuer** `https://oidc.codefresh.io` and a **Subject** matching the [Codefresh subject claim for your preferred pipeline trigger](https://codefresh.io/docs/docs/integrations/oidc-pipelines/#codefresh-trigger-types-for-subject-claims).
The **octopusdeploy-login** step requires an `ID_TOKEN`, which can be generated by running the Codefresh **obtain-oidc-id-token** Marketplace step. This step sets the token as an environment variable which can be passed into the Octopus login step as an argument. See the [Codefresh OIDC documentation](https://codefresh.io/docs/docs/integrations/oidc-pipelines/) for further details.
```yaml
login:
type: octopusdeploy-login
arguments:
ID_TOKEN: '${{ID_TOKEN}}'
OCTOPUS_URL: '${{OCTOPUS_URL}}'
OCTOPUS_SERVICE_ACCOUNT_ID: '${{OCTOPUS_SERVICE_ACCOUNT_ID}}'
```
This step returns `OCTOPUS_ACCESS_TOKEN` as a string, which should be passed into subsequent steps to authenticate.
## Package artifacts
Create zip packages of your deployment artifacts by using the **octopusdeploy-create-package** step. Specify the files to include in each package, the location of those files and the details of the artifact to create. The following step packages all `.txt` files in the `/codefresh/volume` directory into the zip file `/codefresh/volume/Fresh.1.0.0.zip`:
```yaml
create-package:
title: "Create package"
type: octopusdeploy-create-package
arguments:
ID: "Fresh"
VERSION: "1.0.0"
BASE_PATH: "/codefresh/volume"
OUT_FOLDER: "/codefresh/volume"
INCLUDE:
- "*.txt"
```
This step returns a json object with property `Path`.
## Push packages to Octopus Server
Once the artifacts are packaged, use the **octopusdeploy-push-package** step to push the packages to the Octopus Server built-in repository:
```yaml
push-package:
type: octopusdeploy-push-package
arguments:
OCTOPUS_ACCESS_TOKEN: '${{OCTOPUS_ACCESS_TOKEN}}' # Option to replace with OCTOPUS_API_KEY: ${{OCTOPUS_API_KEY}}
OCTOPUS_URL: '${{OCTOPUS_URL}}'
OCTOPUS_SPACE: "Default"
PACKAGES:
- "/codefresh/volume/Fresh.1.0.0.zip"
```
This step has no output.
## Create a release
To create a release, use the **octopusdeploy-create-release** step. Provide the details for your Octopus instance, and the project you would like to create a release for:
```yaml
create-release:
type: octopusdeploy-create-release
arguments:
OCTOPUS_ACCESS_TOKEN: '${{OCTOPUS_ACCESS_TOKEN}}' # Option to replace with OCTOPUS_API_KEY: ${{OCTOPUS_API_KEY}}
OCTOPUS_URL: '${{OCTOPUS_URL}}'
OCTOPUS_SPACE: "Default"
PROJECT: "Project Name"
```
Optional arguments help to customize the creation of the release. You can specify version control details, select packages and provide release notes:
```yaml
create-release:
type: octopusdeploy-create-release
arguments:
OCTOPUS_ACCESS_TOKEN: '${{OCTOPUS_ACCESS_TOKEN}}' # Option to replace with OCTOPUS_API_KEY: ${{OCTOPUS_API_KEY}}
OCTOPUS_URL: '${{OCTOPUS_URL}}'
OCTOPUS_SPACE: "Default"
PROJECT: "Project Name"
RELEASE_NUMBER: "1.0.0-hotfix1"
CHANNEL: "Hotfix"
GIT_REF: "refs/heads/main"
PACKAGES:
- "Sample:1.0.0-hotfix1"
RELEASE_NOTES: This is a release note
```
This returns a json object with properties `Channel` and `Version` for the release that was created.
## Deploy a release
To deploy a release, use the **octopusdeploy-deploy-release** step. Provide details for your Octopus instance, and the project and release you want to deploy:
```yaml
deploy-release:
type: octopusdeploy-deploy-release
arguments:
OCTOPUS_ACCESS_TOKEN: '${{OCTOPUS_ACCESS_TOKEN}}' # Option to replace with OCTOPUS_API_KEY: ${{OCTOPUS_API_KEY}}
OCTOPUS_URL: '${{OCTOPUS_URL}}'
OCTOPUS_SPACE: "Default"
PROJECT: "Project Name"
RELEASE_NUMBER: "0.0.1"
ENVIRONMENTS:
- "Development"
```
Additionally, you can provide optional arguments to specify guided failure mode and variables:
```yaml
deploy-release:
type: octopusdeploy-deploy-release
arguments:
OCTOPUS_ACCESS_TOKEN: '${{OCTOPUS_ACCESS_TOKEN}}' # Option to replace with OCTOPUS_API_KEY: ${{OCTOPUS_API_KEY}}
OCTOPUS_URL: '${{OCTOPUS_URL}}'
OCTOPUS_SPACE: "Default"
PROJECT: "Project Name"
RELEASE_NUMBER: "0.0.1"
ENVIRONMENTS:
- "Development"
VARIABLES:
- "Greeting:Hello"
USE_GUIDED_FAILURE: "false"
```
This returns a json array of created deployments, with properties `DeploymentId` and `ServerTaskId`.
## Deploy a tenanted release
To deploy a tenanted release, use the **octopusdeploy-deploy-release-tenanted** step. Provide the details for your Octopus instance, and the tenants you want to deploy to. You will need to provide either tenants or tenant tags. To deploy an untenanted release, use the **octopusdeploy-deploy-release** step.
```yaml
deploy-release-tenanted:
type: octopusdeploy-deploy-release-tenanted
arguments:
OCTOPUS_ACCESS_TOKEN: '${{OCTOPUS_ACCESS_TOKEN}}' # Option to replace with OCTOPUS_API_KEY: ${{OCTOPUS_API_KEY}}
OCTOPUS_URL: '${{OCTOPUS_URL}}'
OCTOPUS_SPACE: Spaces 1
PROJECT: Project Name
RELEASE_NUMBER: 5.0.0
ENVIRONMENT: Development
TENANTS:
- Tenant 1
```
Optional arguments help to customize the deployment of the release. You can specify prompted variable values, tenants, tenant tags, and guided failure mode.
```yaml
deploy-release-tenanted:
type: octopusdeploy-deploy-release-tenanted
arguments:
OCTOPUS_ACCESS_TOKEN: '${{OCTOPUS_ACCESS_TOKEN}}' # Option to replace with OCTOPUS_API_KEY: ${{OCTOPUS_API_KEY}}
OCTOPUS_URL: '${{OCTOPUS_URL}}'
OCTOPUS_SPACE: Spaces 1
PROJECT: Project Name
RELEASE_NUMBER: 5.0.0
ENVIRONMENT: Development
VARIABLES:
- 'LabelA:ValueA'
TENANT_TAGS:
- tagSetA/someTagB
- tagSetC/someTagD
USE_GUIDED_FAILURE: false
```
This returns a json array of created deployments, with properties `DeploymentId` and `ServerTaskId`.
## Run a runbook
To run a runbook, use the **octopusdeploy-run-runbook** step. Provide the name of the runbook that you want to run, as well as the project and environment name(s).
```yaml
run-runbook:
type: octopusdeploy-run-runbook
arguments:
OCTOPUS_ACCESS_TOKEN: '${{OCTOPUS_ACCESS_TOKEN}}' # Option to replace with OCTOPUS_API_KEY: ${{OCTOPUS_API_KEY}}
OCTOPUS_URL: '${{OCTOPUS_URL}}'
OCTOPUS_SPACE: Spaces 1
PROJECT: Project Name
NAME: Runbook Name
ENVIRONMENTS:
- Development
- Production
```
Optional arguments include variables to use within the runbook, the option to run for specific tenants or tenant tags, as well as the option to use guided failure mode.
```yaml
run-runbook:
type: octopusdeploy-run-runbook
arguments:
OCTOPUS_ACCESS_TOKEN: '${{OCTOPUS_ACCESS_TOKEN}}' # Option to replace with OCTOPUS_API_KEY: ${{OCTOPUS_API_KEY}}
OCTOPUS_URL: '${{OCTOPUS_URL}}'
OCTOPUS_SPACE: Spaces 1
PROJECT: Project Name
NAME: Runbook Name
ENVIRONMENTS:
- Development
- Production
VARIABLES:
- 'Label:Value'
TENANTS:
- Tenant 1
TENANT_TAGS:
- Tenant tag 1
USE_GUIDED_FAILURE: 'false'
```
This returns a json array of created runbook runs, with properties `RunbookRunId` and `ServerTaskId`.
## Push build information
To push build information for a project, use the **octopusdeploy-push-build-information** step. Provide a list of packages that need build information, a build information json file and a version number.
By default, the step will fail if build information already exists, but this can be configured using the `OVERWRITE_MODE` option (`fail`, `overwrite`, or `ignore`).
```yaml
push-build-information:
type: octopusdeploy-push-build-information
arguments:
OCTOPUS_ACCESS_TOKEN: '${{OCTOPUS_ACCESS_TOKEN}}' # Option to replace with OCTOPUS_API_KEY: ${{OCTOPUS_API_KEY}}
OCTOPUS_URL: '${{OCTOPUS_URL}}'
OCTOPUS_SPACE: Spaces 1
PACKAGE_IDS:
- SomePackage
- SomeOtherPackage
FILE: SomeFile.json
VERSION: 1.0.0
OVERWRITE_MODE: fail
```
Sample build information json file:
```json
{
"BuildEnvironment": "BitBucket",
"Branch": "main",
"BuildNumber": "288",
"BuildUrl": "https://bitbucket.org/octopussamples/petclinic/addon/pipelines/home#!/results/288",
"VcsType": "Git",
"VcsRoot": "http://bitbucket.org/octopussamples/petclinic",
"VcsCommitNumber": "12345",
"Commits":
[
{
"Id": "12345",
"Comment": "Sample commit message"
}
]
}
```
This step has no output.
# Error handling
Codefresh provides inbuilt error handling for all steps. Retry of failed steps is enabled using the `retry` settings. See the [Codefresh documentation on retrying a step](https://codefresh.io/docs/docs/pipelines/what-is-the-codefresh-yaml/#retrying-a-step) for more details.
```yaml
version: "1.0"
stages:
- "Login"
- "Deploy project"
steps:
obtain_id_token:
title: Obtain ID Token
type: obtain-oidc-id-token
stage: "Login"
login:
type: octopusdeploy-login
title: Login
stage: "login"
arguments:
# ID_TOKEN is set as an environment variable by the obtain_id_token step
ID_TOKEN: '${{ID_TOKEN}}'
OCTOPUS_URL: "https://example.octopustest.app/"
OCTOPUS_SERVICE_ACCOUNT_ID: <>
deploy:
type: octopusdeploy-deploy-release
stage: "Deploy project"
retry:
maxAttempts: 5
delay: 5
exponentialFactor: 2
arguments:
# OCTOPUS_ACCESS_TOKEN is set as an environment variable by the octopusdeploy/login step
OCTOPUS_ACCESS_TOKEN: '${{OCTOPUS_ACCESS_TOKEN}}'
OCTOPUS_URL: "https://example.octopustest.app/"
OCTOPUS_SPACE: "Spaces-1"
PROJECT: "Create Release Test"
RELEASE_NUMBER: "1.0.2"
ENVIRONMENTS:
- "Development"
```